4.5. menu module
The menu module uses the LCD display and five way switch to provide a method to configure and run MicroPython programs on the TurtlePlotBot without the use of another device such as a computer, phone or tablet. When run from the main.py file it will automatically run each time the TurtlePlotBot is powered on or reset.
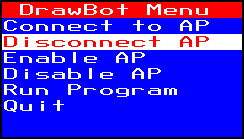
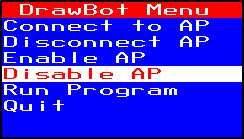
4.5.1. Main Menu

4.5.2. Connect to AP
Use the the up and down buttons to highlight the “Connect to AP” option and press the Center button to select.

The TurtlePlotBot will scan for Wifi Access Points and show a list of all the available Access Points found.

Use the the up and down buttons to highlight the Access Point you want to connect to and press the Center button to select.

If you have connected to the Access Point before the password will already be filled in, otherwise it will be blank and you will have to enter the password using the joystick, buttons and on-screen keyboard.
Button |
Action |
|---|---|
UP |
Moves the keyboard cursor up |
DOWN |
Moves the keyboard cursor down |
LEFT |
Moves the keyboard cursor left |
RIGHT |
Moves the keyboard cursor right |
CENTER |
Selects the current letter from keyboard |
UPPER |
Switches between keyboards |
LOWER |
Moves to next field if any |
Button |
Long Press Action |
|---|---|
LOWER |
Continue |
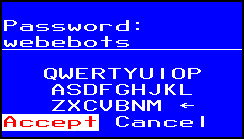
Use the LEFT and RIGHT buttons to highlight “Accept” or “Cancel” then press the CENTER button continue or cancel.

The TurtlePlotBot will attempt to connect to the selected Access Point for up to 30 seconds.
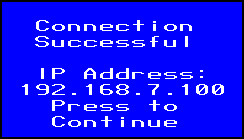
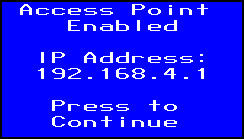
If successful the IP address assigned to the TurtlePlotBot will be displayed and the password will be saved and recalled the next time you connect to the AP. If the connection fails a “Connection Failed” screen will appear. Press any button to return to the Main Menu.
4.5.3. Disconnect AP
Use the the up and down buttons to highlight the “Disconnect AP” option and press the Center button to select.
The TurtlePlotBot will be disconnected from the Access Point.

Press the Center Button to return to the Main Menu.
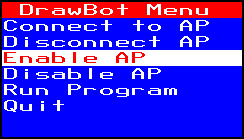
4.5.4. Enable AP
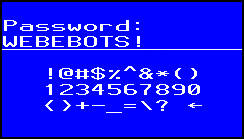
The ESP32 in the TurtlePlotBot has the capability to create a Wifi access point that allows WiFi clients to connect directly to it without using a router. Use the the up and down buttons to highlight the “Enable AP” option and press the Center button to select.
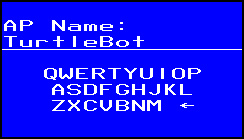
Enter the name and password to use for the new Access Point using the joystick, buttons and on-screen keyboard.
Button |
Action |
|---|---|
UP |
Moves the keyboard cursor up |
DOWN |
Moves the keyboard cursor down |
LEFT |
Moves the keyboard cursor left |
RIGHT |
Moves the keyboard cursor right |
CENTER |
Selects the current letter from keyboard |
UPPER |
Switches between keyboards |
LOWER |
Moves to next field if any |
Button |
Long Press Action |
|---|---|
LOWER |
Continue |
Use the LEFT and RIGHT buttons to highlight “Accept” or “Cancel” then press the CENTER button continue or cancel. The AP Name and password you entered will be saved for the next time.
4.5.5. Disable AP
Use the the up and down buttons to highlight the “Disable AP” option and press the Center button to select.

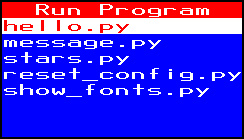
4.5.6. Run Program
The “Run Program” option shows a list of MicroPython programs in the /programs directory and allows you to select one to run.
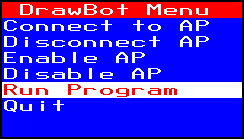
Use the UP and DOWN buttons to highlight a program, then press the CENTER button to run the selected program.