4.4. tftui User Inteface module
The tftui module implements the UI user interface class to provide several different methods to allow user interaction with the TurtlePlotBot using LCD Display and five way button. Methods are provided to display menus, data, individual input fields and forms containing multiple fields.
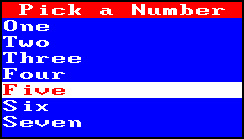
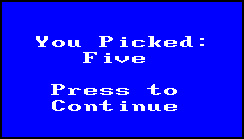
4.4.1. Menu example program
Example program to show a menu of numbers that the user can select and show the number picked. Pressing the left button will exit the menu and program.
tftui menu_example.py running on the ESP32 DrawBot Board:
|
|
1 2 3 4 5 6 7 8 9 10 11 12 13 14 15 16 17 18 19 20 21 22 23 24 25 26 27 28 29 30 31 32 33 34 35 36 37 38 39 40 | """
menu_example.py - Show a menu of numbers that the user can select and show the
number picked. Pressing the left button will exit the menu and program.
"""
import vga2_bold_16x16 as font
import tftui
def main(ui):
"""
Main routine
"""
menu = [
"One",
"Two",
"Three",
"Four",
"Five",
"Six",
"Seven",
"Eight",
"Nine"
]
option = 0
while option is not None:
option = ui.menu("Pick a Number", menu, option)
if option:
ui.cls("You Picked:", 2)
ui.center(menu[option], 3)
ui.center("Press to", 5)
ui.wait("Continue", 6)
ui.cls("Bye!")
main(tftui.UI(font,1))
__import__("menu") # return to turtleplotbot menu
|
4.4.2. Form example program
Here is an example of a MicroPython program that will show a form that allows the user to specify the number of points and the length of the sides of a star to be drawn and then draws it.
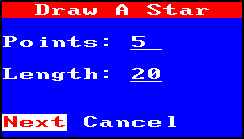
tftui stars.py program running on the ESP32 DrawBot Board
1 2 3 4 5 6 7 8 9 10 11 12 13 14 15 16 17 18 19 20 21 22 23 24 25 26 27 28 29 30 31 32 33 34 35 36 37 38 39 40 41 42 43 44 45 46 47 48 49 50 51 52 53 | '''
Draw a star from user provided values
'''
#pylint: disable-msg=import-error
from turtleplotbot import TurtlePlotBot
import vga2_bold_16x16 as font
import button
import tftui
def star(bot, points, length):
'''
Draw a 'n' pointed star with 'length' sides
Args:
sides: number of points
length: length of each side
'''
angle = 180.0 - 180.0 / points
bot.pendown()
for _ in range(points):
bot.forward(length)
bot.left(angle)
bot.forward(length)
bot.penup()
def main(ui):
"""
Main routine
"""
points = 5
length = 20
ok = 0
form = [
[ui.HEAD, 0, "Draw A Star"],
[ui.INT, 0, 2, "Points:", 8, 2, 2, points],
[ui.INT, 0, 4, "Length:", 8, 4, 2, length],
[ui.OK, 0, 7, ("Next", "Cancel"), ok],
]
btn, ok = ui.form(form)
if btn == button.CENTER and ok == 0:
points = form[1][ui.VAL]
length = form[2][ui.VAL]
bot = TurtlePlotBot()
star(bot, points, length)
main(tftui.UI(font))
__import__("menu") # return to turtleplotbot menu
|
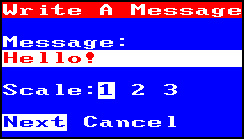
4.4.3. LCD Graphics Example
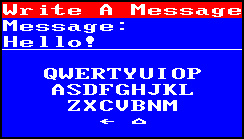
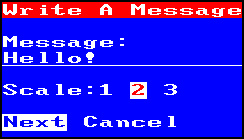
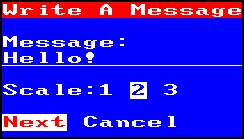
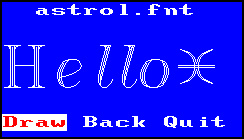
This example is a little more complicated, it lets the user select the size, text and font to write a message using the TurtlePlotBot. A preview of the message is shown on the display drawn in the font that was selected.
|
|
|
|
|
|
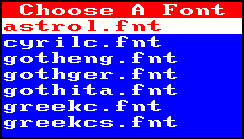
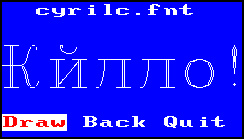
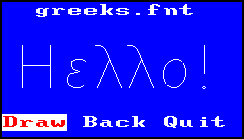
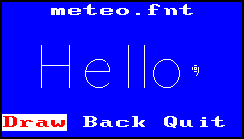
Here are a few examples of the available fonts.
|
|
|

|
I’m not claiming the TurtlePlotBot has the accuracy or resolution to do these fonts justice, but it can try.
4.4.3.1. message.py program
1 2 3 4 5 6 7 8 9 10 11 12 13 14 15 16 17 18 19 20 21 22 23 24 25 26 27 28 29 30 31 32 33 34 35 36 37 38 39 40 41 42 43 44 45 46 47 48 49 50 51 52 53 54 55 56 57 58 59 60 61 62 63 64 65 66 67 68 69 70 71 72 73 74 75 76 77 | '''
Write text using user provided values
'''
#pylint: disable-msg=import-error
import uos
from turtleplotbot import TurtlePlotBot
import vga2_bold_16x16 as font
import tftui
import button
def main(ui):
"""
Write text using user provided values
"""
fonts = [f for f in uos.listdir("/fonts") if f.endswith(".fnt")]
fonts_len = len(fonts)
message = "Hello!"
scale = 0
ok = 0
form = [
[ui.HEAD, 0, "Write A Message"],
[ui.STR, 0, 2, "Message:", 0, 3, 16, message],
[ui.SEL, 0, 5, "Scale:", 6, 5, ("1", "2", "3"), scale],
[ui.OK, 0, 7, ("Next", "Cancel"), ok],
]
again = True
while again:
btn, ok = ui.form(form)
if btn == button.CENTER and ok == 0:
message = form[1][ui.VAL]
scale = form[2][ui.VAL]+1
font = 0
font = ui.menu("Choose A Font", fonts, font)
if font is not None:
while again:
ui.cls(fonts[font], 0)
font_file = "/fonts/" + fonts[font]
width = ui.size(message, font=font_file, scale=scale)
ui.draw(
message,
ui.width//2 - width//2,
ui.height//2,
ui.fg,
font=font_file,
scale=scale)
response = 0
btn, response = ui.select(0, 7, ("Draw", "Back", "Quit"), response)
if btn == button.CENTER:
if response == 0:
ui.cls(0)
bot = TurtlePlotBot()
bot.setscale(scale)
bot.write(message, "/fonts/" + fonts[font])
bot.done()
again = False
elif response == 2:
again = False
if btn == button.UP:
font -= 1
font %= fonts_len
elif btn == button.DOWN:
font += 1
font %= fonts_len
else:
again = False
main(tftui.UI(font))
__import__("menu") # return to turtleplotbot menu
|
4.4.4. Five way switch schematic
Here is the schematic for the five way switch if you are building your own device and would like to use the tftui module.

default five way switch configuration as configured on the ESP32 DrawBot board.
4.4.5. tftui.UI class reference
-
class
tftui.UI(font, log=0)¶ ui: MicroPython LCD user interface class using JoyStick
- Parameters
font (bitmap font) – Bitmap font to use in UI
Returns – UI object
-
static
get(cfg_name)¶ get: get config setting from btree ui.cfg file if one exists
- Parameters
cfg_name ([str, bytes]) – name of setting to load
- Returns
value of setting
- Return type
(string)
-
static
put(cfg_name, cfg_value)¶ put: put config setting into btree ui.cfg file
- Parameters
cfg_name ([str, bytes, bytearray]) – name of setting to store
cfg_value ([str, bytes, bytearray]) – value of setting to store
-
size(message, font='/fonts/romant.fnt', scale=1)¶ Returns the width of a message if drawn in the specified font and scale.
- Parameters
message (str) – The message to write
font_file (str) – The Hershy font file to use, defaults to romant.fnt
scale (int) – Scaling factor
-
draw(message, start_x=0, start_y=32, color=st7789.WHITE, font='/fonts/romant.fnt', scale=1)¶ Draw message on the LCD display at the given location in specified font.
- Parameters
message (str) – The message to write
start_x (int) – column to start at, defaults to 0
int) (start_y) – row to start at, defaults to 32
font_file (str) – The Hershy font file to use, defaults to romant.fnt
-
character(char, col=0, line=0, fg=None, bg=None)¶ Write a character using the fg and bg colors.
- Parameters
char (int) – Char to write at location
col (optional int) – column to write at (defaults to 0)
line (int) – Line number to write on (defaults to 0)
fg (int) – 565 color for character forground
bg (int) – 565 color for character background
-
write(txt, col=0, line=0, fg=None, bg=None)¶ Clear the bg and write txt using the fg color.
- Parameters
txt (str) – Text to write to line
col (int) – Column to start writing at
line (int) – Line number to write on
fg (int) – 565 color for character forground
bg (int) – 565 color for character background
-
writeln(txt, col=0, line=0, fg=None, bg=None)¶ Set the entire line of the display to the bg color then write txt using the fg color.
- Parameters
txt (str) – Text to write to line
col (optional int) – Column to start writing at
line (int) – Line number to write on
fg (int) – 565 color for character forground
bg (int) – 565 color for character background
-
center(txt, line=0, fg=None, bg=None)¶ Set the entire line of the display to the bg color then write txt centered on the line using the fg color.
- Parameters
txt (str) – Text to write to line
line (int) – Line number to write on
fg (int) – 565 color for character forground
bg (int) – 565 color for character background
-
cls(txt=None, line=0, fg=None, bg=None)¶ cls - clear screen optionally centering text on line
- Parameters
txt (optional string) – text to center on line
line (optional int) – line to write on
fg (int) – 565 color for character forground
bg (int) – 565 color for character background
-
wait(text, line=0, fg=None, bg=None)¶ Clear entire line to bg color then write text centered on line in forground color then wait for any button to be pressed and released
- Parameters
txt (str) – text to write to line
line (int) – line to write on
fg (int) – 565 color for character forground
bg (int) – 565 color for character background
- Returns
button pressed
- Return type
int
-
underline(col, line, width, fg=None, bg=None)¶ underline - draw underline on line starting at col for width characters
- Parameters
line (int) – line to draw on
col (int) – character position to start at
width (int) – number of underlines to draw
reverse (optional bool) – true reverse forground and bg colors
show menu and return user selection
Button
Action
UP
moves to the previous menu item
DOWN
moves to the next menu item
CENTER
selects the current menu item
RIGHT
selects the current menu item
LEFT
Cancels and exits menu
Button
Long Press Action
UP
moves to the first menu item
DOWN
moves to the last menu item
- Parameters
menu (list) – list of menu items active (int): currently active
option menu_text (menu) – item to use as menu text if
menu list contains a list or tuple (the) –
- Returns
The index number of the option that was selected or None if the right button was pressed.
Example:
main_menu =[
    ("Option1", test_func1),
    ("Option2", test_func2),
    ("Option3", test_func3),
    ("Exit",    0)
]

selected = ui.menu("Main Menu, 0)
Example using optional menu_text:
# sta_if.scan() returns:
#    Array of tuples
#        (ssid, bssid, channel, RSSI, authmode, hidden)
#
# To make a menu of the SSID's to connect to:
#
scan = sta_if.scan()
connect = ui.menu("Select AP", scan, connect, 0)
-
input(label, max_len, value, kbd=None, header=None)¶ Single field input using onscreen keyboard
- Parameters
label (str) – Label to display
max_len (int) – Maximum value length
value (str) – Field value
kbd (optional list) – list of strings defining keyboard
header (optional str) – header shown at top of display
- Returns
The the button used to exit and the string value
Button
Action
UP
moves highlighted key up one row
DOWN
moves highlighted key down one row
RIGHT
moves highlighted key right
LEFT
moves highlighted key left
CENTER
selects highlighted key
UPPER
changes keyboard (uppercase, lowercase, numbers..)
LOWER
same as enter key, exits field
The left faceing arrow (<-) is the backspace key. The hollow triangle is the enter key that exits the field. The space between these two keys is used as the spacebar.
-
select(column, line, options, value)¶ select -
- Parameters
column (int) – First column of field
line (int) – Line to show input field on
options (list) – list of options
value (int) – index of initial selected option
- Returns
- tuple (exit, value)
exit: exit button value: value as a integer
Button
Action
UP
exits selection field
DOWN
exits selection field
LEFT
move cursor to previous choice
RIGHT
move cursor to the next choice
CENTER
exits and returns current selection
-
form(items, line=7)¶ Display a form created from a list of field definitions and allow the user to edit it.
- Parameters
items (list) – list of form items
line (int) – line to show Accept / Cancel selection on exit
- Returns
Bool: True if Accept selected, False if Cancel selected on exit. Defaults to line 7
Button
Action
CENTER
Next field
Button
Long Press Action
CENTER
Exit form
LEFT
Previous field
RIGHT
Next field
Field Definitions
HEAD:
Display text on line centered with forground and bg colors reversed.
- Parameters
[HEAD, line, text]
Parameter
Description
HEAD
Create header field
line
Line to display field on
text
Text to display
CENTER:
- Parameters
[CENTER, line, text]
Index
Parameter
Description
0
CENTER
Create center field
1
line
Line to display field on
2
text
Text to display
STR:
- Parameters
[uio.STR, l_col, l_line, label, col, line, max_len, value]
Index
Parameter
Description
0
STR
Create string field
1
l_column
Label column
2
l_line
Label line
3
label
Label text
4
column
Field column
5
line
Field line
6
max_length
Field max length
7
value
Value of field
INT:
- Parameters
[uio.INT, l_col, l_line, label, col, line, max_len, value]
Index
Parameter
Description
0
INT
Create int field
1
l_line
Label line
2
l_column
Label column
3
label
Label text
4
column
Field column
5
line
Field line
6
max_length
Field max length
7
value
Value of field
TEXT:
- Parameters
[TEXT, column, line, text]
Index
Parameter
Description
1
TEXT
Create text field
2
column
Column to display field at
3
line
Line to display field on
4
text
Text to display
SEL:
- Parameters without label:
[SEL, column, line, [selection_list] , selected]
Index
Parameter
Description
0
SEL
Create selection field
1
column
Column to display field at
2
line
Line to display field on
3
[selection_list]
List of strings to select
4
selected
Currently selected string
- Parameters with label:
[SEL, l_column, l_line, label, column, line, [selection_list], selected]
Index
Parameter
Description
0
SEL
Create selection field
1
l_column
Column to display label on
2
l_line
Line to display label on
3
label
Label to display
4
column
Column to display field at
5
line
Line to display field on
6
[selection_list]
List of strings to select
7
selected
Currently selected string
OK:
- Parameters
[OK, column, line, [selection_list] , selected]
Index
Parameter
Description
0
OK
Create OK field
1
column
Column to display field at
2
line
Line to display field on
3
[selection_list]
List of strings to select
4
selected
Currently selected string